Base Station
A base station is a GPS receiver at an accurately-known fixed location which is used to derive correction information for nearby portable GPS receivers, in this case the portable receiver is in the aircraft. This correction data allows propagation and other effects to be corrected out of the position data obtained by the aircraft, which gives greatly increased location precision and accuracy over the results obtained by uncorrected GPS receivers.
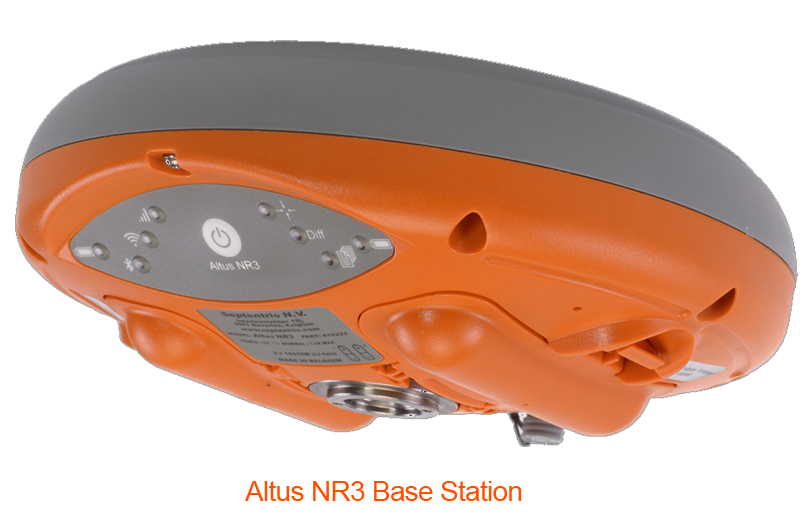
The recommended base station is the Septentrio Altus NR3 as it is precise, easy-to-use, and not cost prohibitive. However, RINEX data from other base stations or reference networks can also be used, and thus are still compatible with GeoTagZ.
The following is a simple walkthrough for using the Altus NR3 as a base station. This is by no means an exhaustive explanation as GNSS position refinement techniques are relatively sophisticated. For more information and advanced settings, please see the Altus User Manual which can be found here.
Configuring the Altus as a Base Station
Connecting to the Web Interface
The base station makes a WiFi point. WiFi is turned on by default and will be available about 30 seconds after powering on. On your PC or mobile device, find the WiFi network and click Connect (there is no password). Open a browser and type 192.168.20.1 in the address bar.
Configuring Data Logging
On the NMEA/SBF Tab ⇨ NMEA/SB Logging
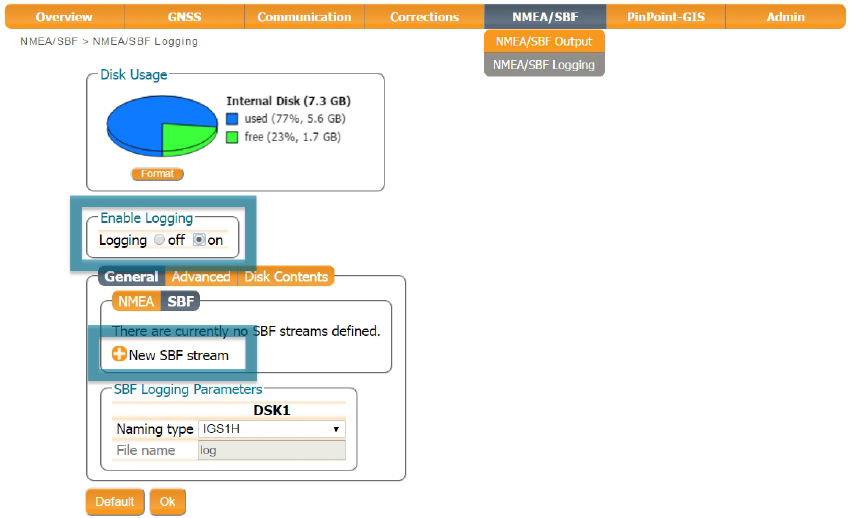
- Enable Logging can be set to on or off. If 'on' is selected, the base will begin logging as soon as it is turned on. If 'no' is selected, the base will only log when you decide to begin logging by short-pressing the power button located on the Altus receiver.
- Select
SBFunderGeneralsettings - Choose
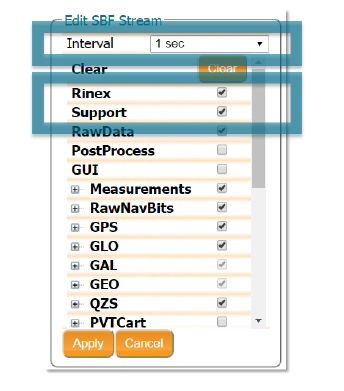
New SBF stream. A new window will open - Select to log data at 1 sec interval
- Choose
RinexandSupport. This option will automatically select the individual SBF blocks required for GeoTagZ processing.
Set the Base Station Position as Static
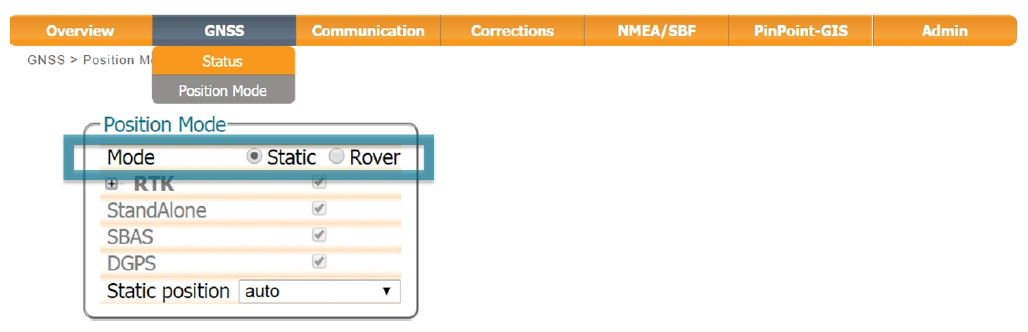
On the GNSS Tab ⇨ Position Mode
To work as a Base station, the position of the Altus NR3 should be configured as static. The ‘Static’
position mode should be selected as shown.
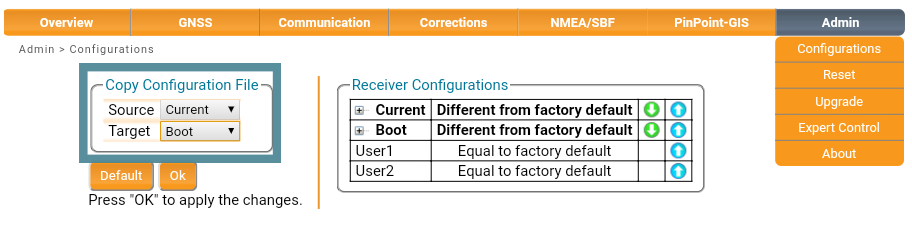
Copy Configuration
You will want to configure your base to power-on with your new settings everytime. To do this, go to the Admin Tab ⇨ Configurations
In the Copy Configuration File section:
- Set 'Source' to
Current - Set 'Target' to
Boot - Press
OKto apply changes
Using the Base Station
Logging Data
- Assemble your tripod and base. The location of your setup does not really matter, but it should be at least roughly 10 meters away from any obstacles or building.
- Turn on by pressing the power button.
- Verify your base battery status.
- To start logging, short press the power button (only applies if Enable Logging was set to 'no'). Logging is active when the page icon has a green light. For good results you should log for at least 61 minutes, or the entire duration of your flight, whichever is longer.
- Connect to the WiFi to check how many satellites you have by opening the
GNSS Tab⇨Status. In open sky, the Altus NR3 should track between 15 and 25 GPS and GLONASS satellites. - Fly.
- Land and shutdown your aircraft.
- To stop logging, short press the power button.
- To turn off, press and hold the power button for 2 seconds.
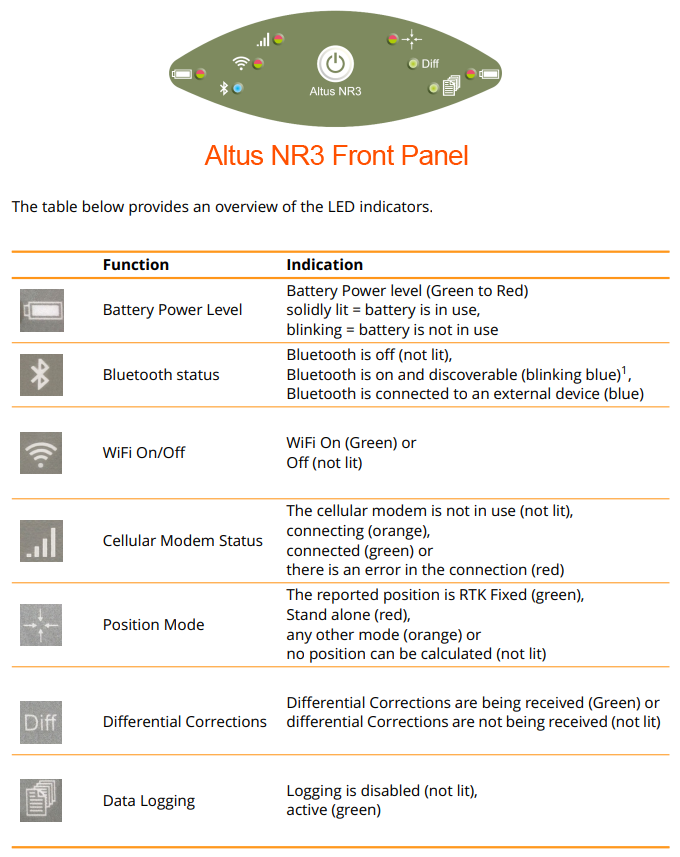
LED Meanings
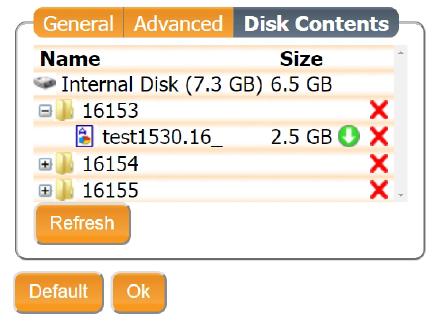
Downloading Data Files
- Connect to the base WiFi
- Under the
NMEA/SBF Tab⇨NMEA/SBF Logging - Select
Disk Contents - Find your most recent base file, or the one that correlates to your flight.
- Select the
green arrowto download.
Finding your Base Location
Your base station will estimate its location, but unfortunately that location is only accurate to 1-5 meters without a correction source. The following is a non-exhaustive list of correction sources or methods that you may use to determine your location, either before or after your flight. Some services require a fee or subscriptions; others are free.
- Shoot an RTK point for the base location
- Known location (survey monument)
- Static point for the base and correct via CORS
- Static for the base and correct with PPP (Precise Point Positioning)
- Use PPP in real time via satellite or modem
Workflow Example: Correcting a Static Point with PPP after your Flight
In this example, you will take your raw observations that you downloaded from your base and upload them to a free PPP correction service.
- With you base setup nearby and at an unknow location, log for at least 61 minutes.
- Covert your SBF file to RINEX using RxTools, or just output RINEX files. RxTools can be found here
- Compress your RINEX files together as a zip or gzip.
- Visit Natural Resources Canada's PPP website here
- Create an account and sign in.
- Upload your compressed RINEX file. Note, you must wait 24 hours after logging before submitting.
- Choose 'Static Point' and set the geodetic frame to ITFR (International Terrestrial Reference Frame).
- Waiting for results is variable and can take anywhere from 10 minutes to 24 hours depending on time of day and server backlog.
- Results containing your base latitude, longitude, and altitude will be emailed to you.
- Check 'Set Reference Position' in GeoTagZ and type in your base location.