Standard Mapping Payload
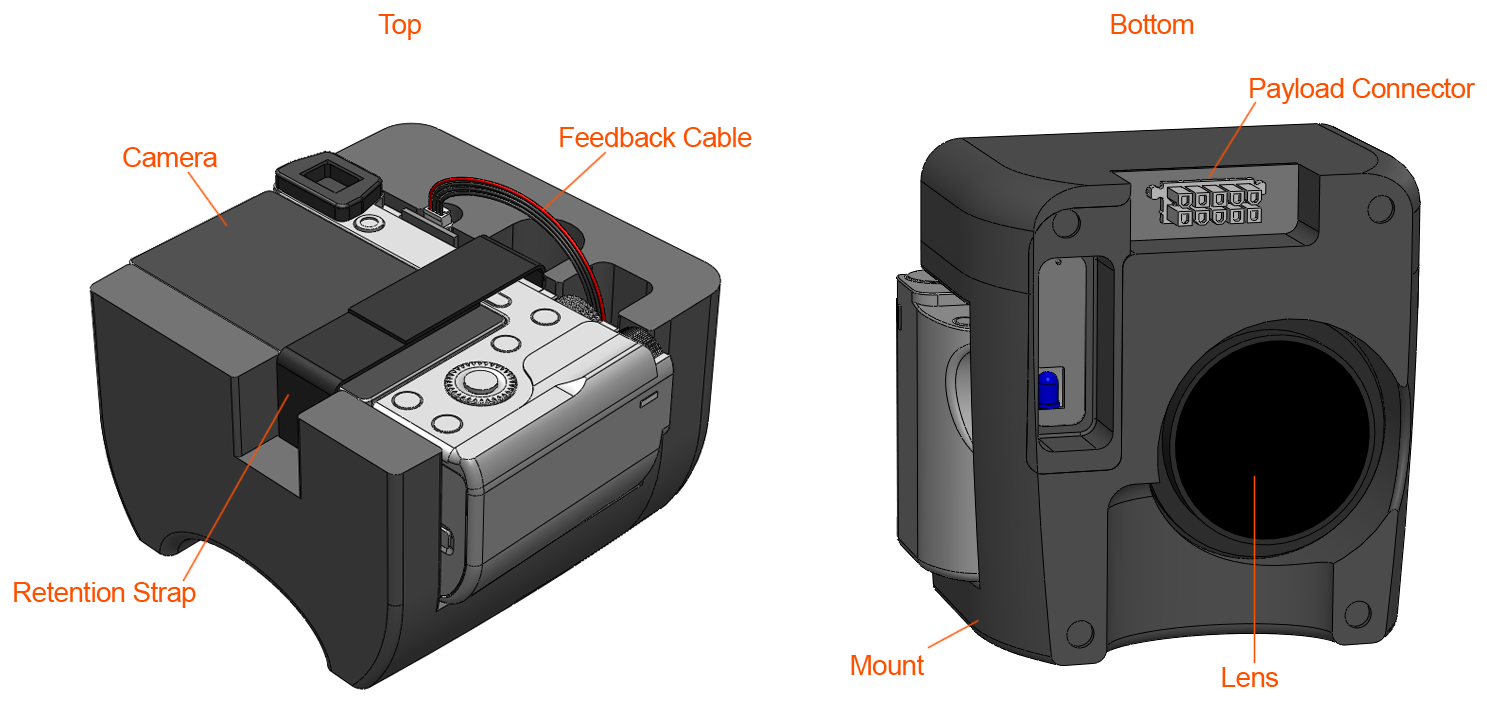
The Standard Mapping Payload uses the 24 MP (megapixel) Sony a6000 which features a large APS-C sensor and shutter feedback for optional PPK tagging. The camera sits in a ruggedized mount with an integrated payload connector and trigger board.
Technical Specifications
| Sony a6000 | Specs |
|---|---|
| Sensor | 24 MP, APS-C, RGB |
| Lens | Interchangeable 20mm (as setup) |
| GSD at 90 m (~300 ft) | 1.76 cm/px |
| GSD at 120 m (~400 ft) | 2.34 cm/px |
| Coverage at 90 m (~300 ft) | 3.3 km2, 815 acres (60% sidelap) |
| Coverage at 120 m (~400 ft) | 4.5 km2, 1100 acres (60% sidelap) |
| PPK Capable | Yes |
| Weight | 448 grams |
| Data | single images, point clouds, orthomosaics, 3D models |
Image Settings
The camera settings in the table below should be verified before each flight. The camera should hold these settings unless there was an error or a problem shutting down after making changes.
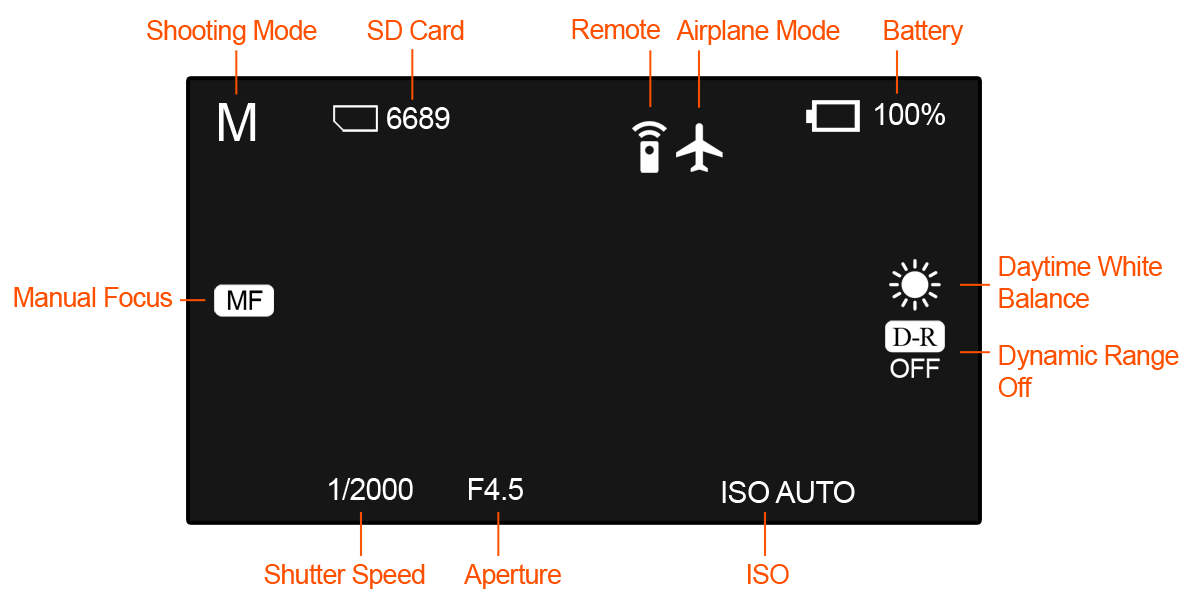
| Setting | Value |
|---|---|
| Shooting Mode | Manual |
| SD Card | Empty |
| Remote Control | On |
| Airplane Mode | On |
| Battery | Full |
| White Balance | Daytime |
| Dynamic Range | Off |
| ISO Speed | Auto |
| Aperture | F4.5 |
| Shutter Speed | 1/2000 |
| Focus | Manual |
| LCD Brightness | -2 |
Tip: Set and check the focus of the camera before turning the screen brightness down.
Installing the Camera
The compass on Lynx VTOL can be sensitive to payload changes and may require a compass calibration once your custom payload is installed within the payload bay. See the Calibration section for more information.
With the payload connector facing forward as shown, slide the mount (with or without camera attached) into the payload bay. If aligned correctly, the payload connector will fully seat and the top of the camera mount will be parallel with the top of the fuselage.

The payload connector is what is know as 'blind mating' which can account for some misalignment. However, do not force the connector into place. Doing so may damage the fuselage or camera mount.
Removing the Camera
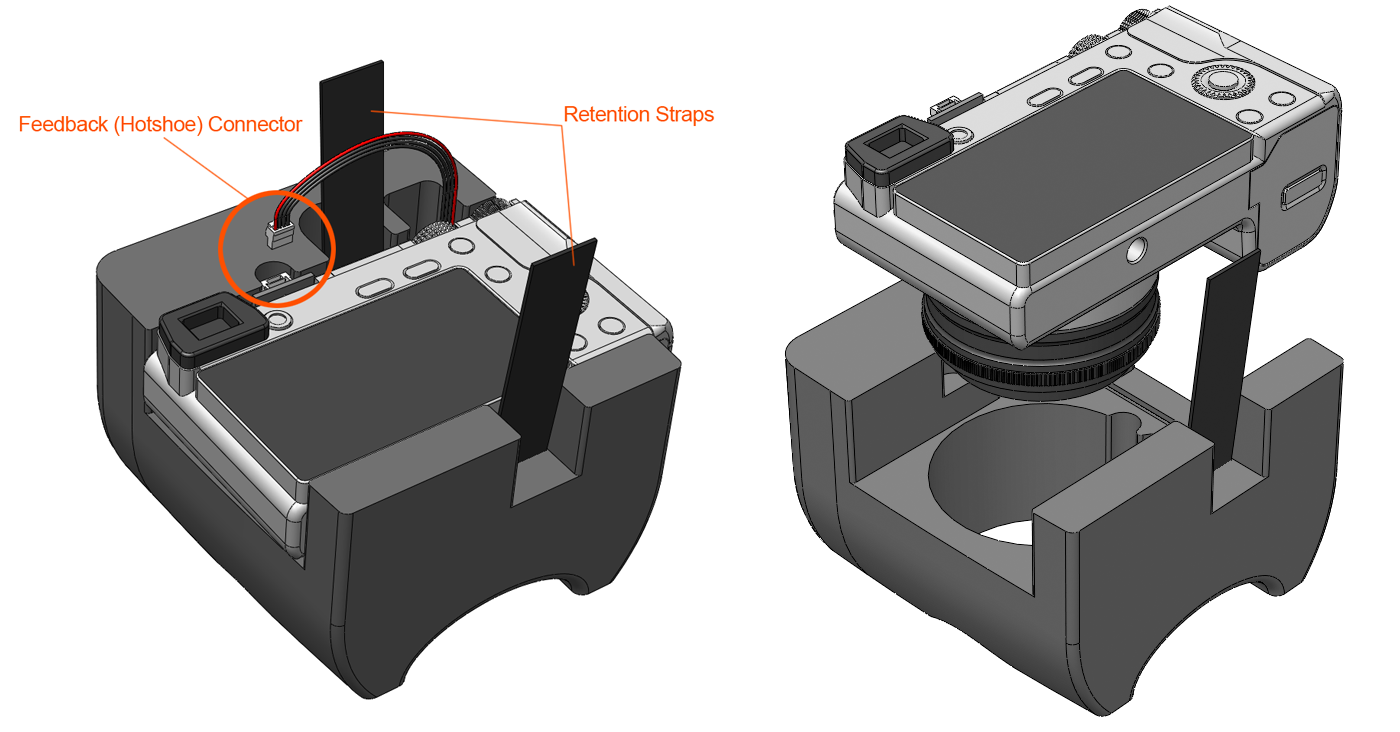
To remove the camera from the mount:
- Disconnect the feedback connector from the hotshoe board
- Undo the retention straps
SD Card and Battery
The camera's SD card and battery are located on the bottom of the camera behind a hinged door.

Providing your own Camera
Menu Configuration
The camera settings in the table below are set by SRP Aero if you purchase a payload with your Lynx VTOL. If you are providing your own camera, the following menu settings must be configured before flying. To begin, turn the camera on and enter the menu by pressing the MENU button. Change the settings as indicated below. When finished, turn the camera off using the ON/OFF switch to save your settings. Turning the camera off by ejecting the battery may not save the settings. The camera should hold these settings unless there was an error or a problem shutting down after making changes.
| Menu | Page | Setting |
|---|---|---|
| Camera Icon | 1 | Image Size – L:24M |
| 1 | Aspect Ratio – 3:2 | |
| 1 | Quality – Fine | |
| 2 | Drive Mode – Single-Shooting | |
| 2 | Focus Mode – Manual Focus | |
| 3 | Focus Area – Wide (If using AF) | |
| 3 | AF drive speed – Fast (If using AF) | |
| 3 | Exposure Comp. - +/- 0 | |
| 4 | ISO – ISO AUTO | |
| 4 | White Balance – Daylight | |
| 4 | DRO/Auto HDR – Off | |
| 4 | Creative Style – Standard | |
| 4 | Picture Effect – Off | |
| Gear Icon | 1 | Zebra – Off |
| 1 | Auto Review – Off | |
| 2 | Peaking Level – Off | |
| 2 | Live View Display – ON | |
| 3 | Zoom Setting – Optical zoom only | |
| 3 | FINDER/MONITOR – Monitor | |
| 3 | Release w/o Lens - Enable | |
| 4 | AEL w/ shutter – Auto | |
| 5 | Lens Comp. - all to Auto | |
| 6 | Custom Keys - all to "Not Set" | |
| 6 | Dial/Wheel Ev Comp – Off | |
| 6 | Dial/Wheel Lock – Lock | |
| Wireless Icon | 1 | Airplane Mode - On |
| App Icon | n/a | n/a |
| Playback Icon | n/a | n/a |
| Briefcase Icon | 1 | Monitor Brightness - Manual |
| 2 | PWR Save Start Time - 30 Min | |
| 3 | Remote Ctrl - On |
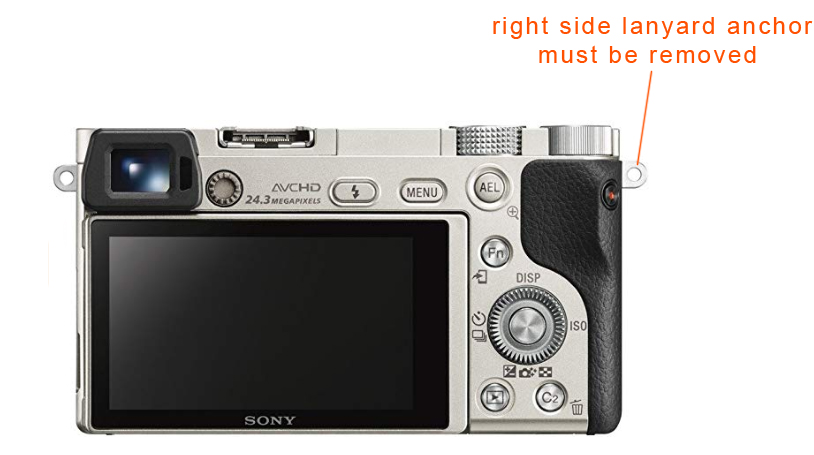
Physical Modifications
The lanyard anchor on the right side of the camera must be removed in order for your camera to fit properly within the payload bay. Use a Dremel cutoff wheel (or similar rotary tool) to remove most of the anchor. You may have to make multiple small cuts to minimize heat buildup and to prevent scratching the camera. Finish by grinding the anchor down with a sanding wheel. At a minimum, ensure the lens cover is installed when cutting. Dust-off the camera when finished.