Cleaning a VTOL Motor
In dusty environments, motor thrust will kick-up significant dust during takeoff and landing. The aircraft should be cleaned after each flight if dust has visibly accumulated. Ensure the main and VTOL propellers are wiped clean in addition.
Check that each VTOL motor spins freely by hand. A motor that grinds, clicks, or is difficult to turn usually indicates that ferrous (iron) dust, gravel, or sand is stuck to the motor's magnets. Since the dust is likely attracted to magnets, the dust can be tricky to remove. First try a combination of compressed air and vacuuming. Blow air directly through the motor from the top by aiming at the magnets and windings. This is the highly preferred method as no disassembly is required. However, if the dust cannot be removed with compressed air/vacuum, and it is obstructing the motor from freely spinning, the motor needs to be disassembled to wipe away the dust.
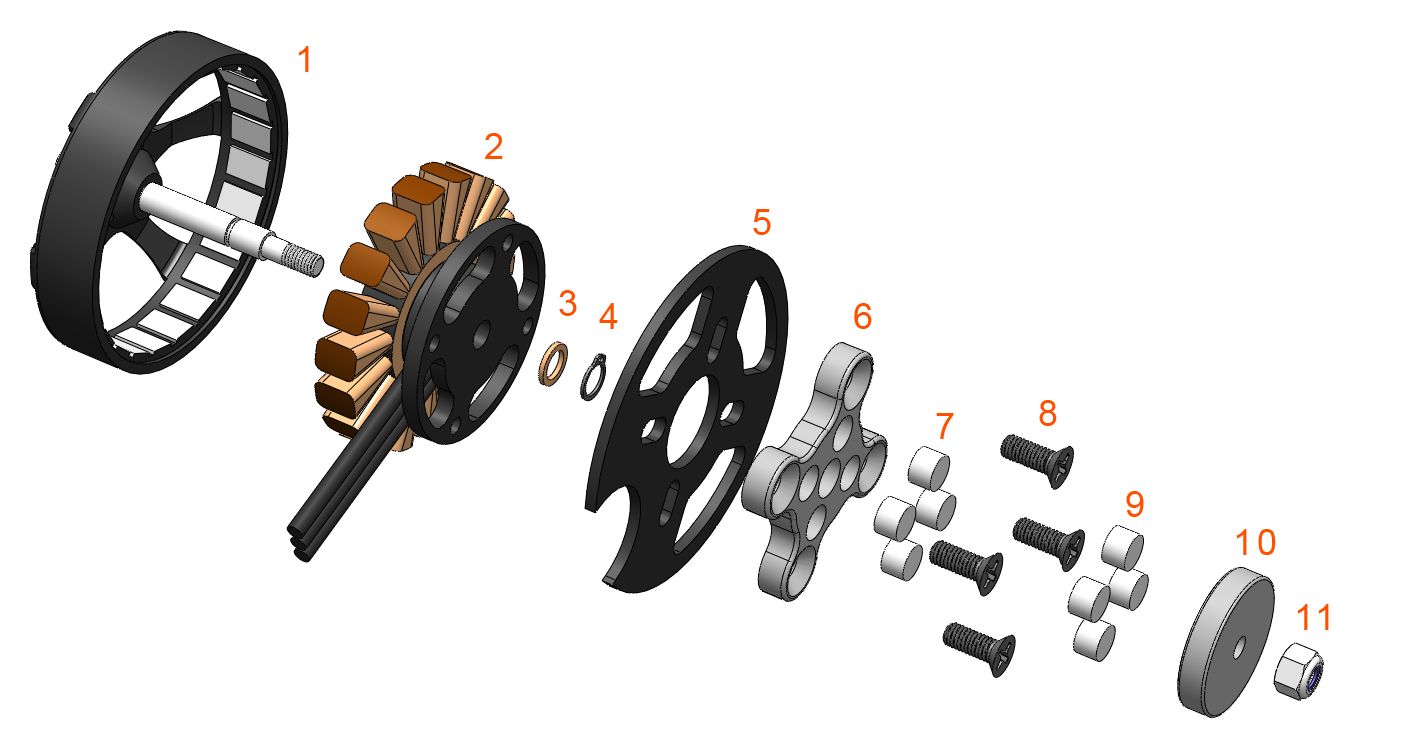
VTOL Motor Exploded View
| Item | Description |
|---|---|
| 1 | VTOL motor rotor |
| 2 | VTOL motor stator |
| 3 | Copper bushing |
| 4 | Snap ring (C clip) |
| 5 | Motor boom bulkhead |
| 6 | Magnet aligner bulkhead |
| 7 | Bulkhead magnets x4, glued |
| 8 | Motor screws, M3, x4 |
| 9 | Disc magnets, x4, glued |
| 10 | Magnet aligner disc |
| 11 | Locknut, M3 |
Tools Needed: Phillips screwdriver, torque wrench, snap ring pliers, 5.5 mm socket or small crescent wrench, blue thread locker (medium strength). Fast thin CA glue and toothpick as required.
Disassembly
Reference the VTOL Motor Exploded View above.
- Disconnect the batteries from the aircraft.
- Unscrew the locknut (11) with crescent wrench or 5.5 mm socket.
- Remove magnet aligner disc (10) by rotating the disc 90 degrees, this will cause the magnets to push against each other.
- Inspect the magnet aligner disc (10) and magnet aligner bulkhead (8) for any dust attracted to the magnets (7,9) and clean as necessary. Also check for loose magnets.
- If any magnets are loose: Loose magnets are fixed by applying a drop of fast thin CA glue to the top of the magnet. Spread the glue to the edges of the magnet with the tip of a toothpick or similar to allow the glue to seep in around the magnet. Allow glue to dry. The magnets must be arranged with alternating polarity in order to align the propeller. See the following diagram.

- Unscrew the four motor screws (8) with Phillips screwdriver.
- Remove magnet aligner bulkhead (6).
- Slide the motor up until the motor shaft is clear of the motor boom bulkhead (5). The motor can not be completely removed as it is attached by its wires.
- Gently remove the snap ring (4) from its groove using snap ring pliers. If the ring is damaged from disassembly, it must be replaced.
- Slide the copper bushing (3) off the shaft.
- Grasp the base of the motor stator (2) with one hand, and the motor rotor (1) with the other, and pull the two apart. You will feel a strong resistance from the motors when pulling.
With the motor disassebled, remove any and all dust that is causing the motor to grind. This can be accomplished with the help of compressed air and vacuuming, or by wiping away the dust with cotton swabs or paper towels. For stubborn dust, try using a piece of tape to remove it from the magnets. Larger gravel pieces can be removed with tweezers.
Assembly
Reference the VTOL Motor Exploded View above.
- Disconnect the batteries from the aircraft.
- Carefully slide the motor rotor (1) and motor stator (2) back together by lining up the motor shaft with the stator. The motor will want to snap back together due to the magnets. Avoid this by holding onto the motor and slowly letting the two halves come together.
- Slide the copper bushing (3) back onto the shaft.
- Install the snap ring (4) back into its groove using snap ring pliers. Ensure the copper bushing (3) is between the motor and snap ring (4). There should be no vertical play in the motor.
- Slide the motor shaft back through the motor boom bulkhead (5).
- Place the magnet aligner bulkhead (6) around the motor shaft and line-up the screw holes with the motor.
- Apply blue thread locker to the four motor screws (8) and screw the motor down using a cross pattern. Incrementally finger-tighten each screw and then torque to 7-9 in/lbs (0.8-0.1 Nm).
- Slide the magnet aligner disc (10) onto the motor shaft.
- Thread the locknut (11) onto the shaft until it just comes into contact with the manget aligner disc (10).
- Align the propeller to be parallel to the motor boom and then tighten the locknut (11) a 1/16 turn. Overtightening the locknut will cause the magnet aligner disc to get jammed on the motor shaft. It may take a few tries to get the propeller properly aligned. To retry, simply loosen the locknut, realign the propeller, and repeat the process.